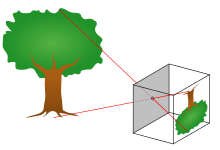
The pinhole acts as the lens, the light being emitted outside the box is forced through the pinhole onto the photographic paper; which is able to record the image coming through the pinhole. However the image being recorded will project onto the paper as an inverted image (it will be upside down and back to front).
If you don’t understand here’s an illustration of the process
See the red lines are the light, because light only travels in a straight line the image becomes inverted.
Now whether the image is clear, detailed or comes through at all is to do with the exposure, i.e the amount of time you allow for light to enter the pinhole. The time will defer whether the image being recorded is inside or outside. Remember how the pinhole is the aperture, well that’s measured in increments called f-stops, that’s how you can work out how long you’ll need to lift the shutter to let the light travel through.
Here’s the calculation:
f-stop = distance from pinhole to paper (mm)
diameter of pinhole (mm)
So the distance from pinhole to paper, is exactly what it says; so you’re measuring (with the lid on if you have one) from the pinhole to where the photographic paper will lie.
Here’s my calculation:
f-stop = 104
0.8
We then use the combination of f-stop (f-130), film speed (6 ASA) to calculate the shutter speed (exposure time in seconds/minutes)
Now before I go on to tell you all about my photo’s you’ll need to know what to do once you have taken a photo…
So lined up are 3 containers, the first has some sort of chemical that will make the image captured visible, the second is water which cleans the photo, and then the third has another chemical that sort of cleans up the image. Of course you can’t just chuck the photographic paper in and hope for the best because your image will most probably end up ruined.
Now placing the photographic paper into the 1st container and making sure it’s completely submerged in the liquid, leave it there for 30 seconds. During those 30 seconds you’ll know if you have succeeded in taking a picture, because it’ll gradually come through on the paper. That's something that will fascinate you the first time.
Once the 30 seconds are up take out the photo (because that’s what you have now), WITH a pair of TONGS; and place it in container number 2 for 10 seconds. After which you’ll again remove the photo with the tongs and then put it in container number 3 for 30 seconds.
At this point your photo has been developed; you can now take it out and see it properly in the light after which you should put it back into a container of water. After my first photo I just put all developed photos straight into another water container whilst I reset my pinhole camera. Once done I put the photos through a photo dryer.

No comments:
Post a Comment