Wednesday 22 September 2010

World's Largest Pinhole Camera... For real!

A team of six artists of the Legacy Project and an army of assistants and volunteers converted an abandoned F-18 jet fighter hanger at El Toro MCAS in Orange County, California into a gigantic pinhole camera, and then hung a single, seamless piece of light sensitive muslin cloth from the ceiling of the hanger.
On July 8, 2006 the cloth was exposed to light streaming through a hole less than 1/4″ in diameter.

Below is the photo, called The Great Picture and according to the Guinness Book of Records, the world’s largest photograph taken by the world’s largest camera.
That is quite the amazing feat, at the beginning of this blog and assignment it was weird trying to get my head around being able to take a picture with a pin-hole. Sure it made sense but it’s pretty amazing and of course this is where photographs began; no matter how much technology evolves this is still the beginning and this photo is a great example of that.

For me this has been the best part of looking at pinhole photography, sure I took my own photos and developed them but this just is something else. The guy who came up with the idea to do this Clayton Spada, had just came back from a summer in China where he had led students in the making of large scale pinhole photographs; its like this was an instant thought, who knows if anyone else would of thought of this... It might be where photography began but most people would have been all well we can just take a picture on my digital camera or we could have an artist paint it??? That's simply inspirational and has to be a sign to think bigger!


If you want to look at basic pinhole camera stuff or read about how they developed such a gigantic photo check out the link below...

Tuesday 21 September 2010

Does this blog have a point?

Yes. All pinhole cameras’ have a point of entry from which light comes in and the image is captured!

But what’s the point of pinhole cameras?
Well pinhole cameras are usually handmade by the photographer for a particular purpose.


I suppose that's as good as any place to start really. What does the photographer want from the photo? If they’re going to be using a pinhole camera?
They obviously want a different type of photo
They’re looking for something specific
They are willing to take their time


Wolf Howard a member of the Stuckism Photography group takes pinhole photos, here are his thoughts...

"There is something special about a pinhole camera. There is a beauty in its simplicity and rawness that technology has not been able to better. There is a timeless quality that can make the most uncomplicated subject seem full of poetry.
In each pinhole picture I take I hope to capture the joy and excitement that the early pioneering photographers (Fox Talbot and friends) must have felt when they took and developed photographs for the very first time"

I suggest you check him out... http://en.wikipedia.org/wiki/Wolf_Howard


So I've given you my thoughts on pinhole cameras, I've shown/told you what I liked and I've basically given you the general idea of pinhole photography.
Also I'm pretty sure I've given you the point; and I'm almost certain I've given you something to think about too.

Now you could always say I don't know, but why not think about it.

Monday 20 September 2010

Looking into the Pinhole...


I did some research into pinhole photography and looked at these websites:
My favourite pieces came from the first and last site; but I suggest you check them all out because they are different from one another. Where some have pinhole photos or videos submitted by people, others are simply one user pin-holing in their own unique way...


pinholephotography.org work by Justin Quinnell

6 month's over Bristol
Camera's recorded views of Bristol with the sun trailing across the sky from the winter solstice (22nd December) to the summer solstice (20th June), this is actually a common use of pin hole photography called solography. JQ is not the only person to have done this there has been Paolo Gioli in Italy and Tanja Trygg in Finland.

Quinnel describes the piece as "...capturing a period of time beyond what we can perceive with our own vision."
I think that this sort of long-term pinhole photography, is particularly interesting in that if any structural changes take place during the time-frame, an outline can usually be made out or clearly seen; similar to that of a 3 minute exposure where the camera has moved. Of course there is the interest in how the sun trails across the sky and leaves a sort of residue trail showing exactly where its been, which is pretty amazing because its obviously there but impossible for the human eye to pick up.

Clifton Suspension Bridge, Bristol, UK.
December 17th 2007 - June 21st 2008


Justin also does a lot of mouthpiece work using his own creation a SmileyCam: a small camera, which can actually fit in your mouth.
  SmileyCam

For me JQ has shown an individual evolution in photography, you probably could shoot a photo from your mouth just by placing your camera there but I don't think you would be able to deliver a photo quite like his, nor would the camera be so disposable or durable. Also it gives its own style of lighting every time.

g 
________________________________


 pinhole.nl/

On this site all photos have been submitted in particular I looked at people on the site. I found that few managed to remain still enough in the photos to combat blurring, but when I thought about it the blurring seemed to be intentional in some, so as to add an effect to the photo.
Noticeably where the faces are blurred there isn't definition/details however their features remain clear for most.
In other aspects such as lighting and stillness there is much experimentation.
Here are two examples that I liked the most...


This is a staged photo, you can tell by the simple factor of whether there's blurring or not. 
- the car is not moving. The outside would be blurred, due to the constant movement during the exposure time
- the drivers hands and body are not blurred suggesting he hasn't moved his hands to steer and stares ahead the whole time whilst "driving"
-the photo also makes me wonder whether the exposure timing would be inside or outside.

This is an especially good photo as it shows experimentation, planning and thought. I'm guessing the photographer has done this before wanted to try something different.
When I first saw the photo I didn't realise there was a child in it, I thought that perhaps the photographer had caught something in the photo accidentally. However when I looked properly I got the understanding that at some point there had been a child keeping still long enough during the exposure to catch its image, not details but an outline and colouring.
I like how the photographer managed to capture the image of the child translucent enough for the landscape image to come through in the background.


I recommend that you take a look at the videos on the site; they give another perspective of ways in which to use a pinhole camera.

My favourite was the one which is displayed straight away; it begins with the dancing doll shoes. when I first watched it I couldn't help but think about how hard it must of been to do some of the shots, but then I realised there had been editing. 
Although certain shot would have taken longer than others such as the underwater shot; as the problem is no longer keeping light out its mainly making sure no water interferes with the film. Also the shot of the yacht passing by, which would have been time consuming, because they had to wait for the yacht to come pass. How long did they leave the camera there for? As you have to consider the exposure time as well as knowing when the yacht would pass or did they perhaps get lucky.

Sunday 19 September 2010

Anything you could do, I could do better. I can shoot Pinhole photos, better than you.

Remember how I told you in the intro post about even the most experienced pinhole photographer not being able to take a perfect photo every time. You do? Good because, remember this is my first time. 

My first photo had an exposure time of 3 minutes and was taken outside behind the bike cage. I placed the camera on top of a low brick wall with the pin hole facing a brick wall. 
Original

Negative 
I think that the image came out quite well considering it was my first time; I especially like the outline detail given by the bricks. It’s interesting how the building and the trees in the background with the sky contrast.
The slight blurring on the side of the building caused by the camera movement that has created an undefined outline, obviously happened at the beginning of the exposure as it was long enough for it to capture but not fully before it moved. In this photo you also get the circular lighting, something that isn't featured as much in the latter of the photos that I shot.

My second photo had an exposure time of 4 minutes and 30 seconds. I took this outside inside the bike cage and placed the camera inside one of the bikes baskets facing the wall that was in photo no.1.
Original


Negative 
With a longer exposure time there was more definition and detail to the photo. Also this photo had more layers to it starting with the basket then the guard thing that the bike was attached to the wall of the bike cage and ending with the brick wall of the building it’s facing. When considering the layers of the photo you need to study it, otherwise you'd quite easily miss the darker line going through the middle of the photo; which shows you where the outside pavement and wall meet.
I like how this is the sort of photo where you'd have to think about exactly where it is.


My third photo had an exposure time of 15 minutes and was shot inside the library, towards the back showing the window. I placed the camera on top of one of the bookcases looking outside.
Original

 Negative 
  
There’s so many things in this photo that you can easily miss or just look over, when I first looked at this I barely saw anything of interest and though it was quite bad. However on second glance I noticed, (what I thought was a smudge or a blur of colours at the bottom right) an outline of a computer and to the left of that the man working at his computer. His movement has caused the blurring but you can clearly see the outline of the computer, desk and his chair.
Then if you look "outside" through the window you can actually see the reflection of the library in the glass, showing all the computers.
Only downside of the photos was cause by me and that's my extremely noticeable fingerprints on the photo, which occurred whilst I was developing it.
Another thing I like about this photo is how it fades into the space on the paper that was exposed to the light; I see it as a nice natural effect.


My fourth photo had an exposure time of 17 minutes and was shot inside at the downstairs fire exit doors. I thought I might get a little creative and sat the camera in my lap at an angle so it was wedged in the crevice between my legs, when I sat down with my legs straight out.
 
Original

Negative 

I am not sure whether with less or more time would it be more detailed as, the contrasting colours of the black and white were quite strong on there own. However you are able to make out the door lever at the top and then the handlebars used to push open the door.
Considering the camera wasn't standing on its own I think that blurring is minimal with the faintest of shadows actually showing.


My fifth photo had an exposure time of 22 minutes and was shot inside the stairwell, I left the camera on the banister against the wall so that it captured both the up and down parts of the stairs.

Original

Negative

I can only think that the photo was over exposed so that's why nothing came up, however that doesn't explain the two black ovals, that did develop on the paper but I think they could be lights perhaps?


Any difficulties?
Despite trying my hardest to not get my fingerprints on the photos they still showed up. I really don't understand how it still happened as after around the second photo when I noticed I’d left fingerprints on the photo I tried not to touch the photos at all being extra careful with the tongs as well. But c'est la vie I guess it wasn't meant to be anyway I can always say that my fingerprints on the photos show the connection me the artist has with the photographs having found locations, shot photos, developed the project was hands on and that's exactly what the prints show.

Saturday 18 September 2010

Yeah right! Like a pinhole can take a picture...

So I’ve made the camera, but how does it work?

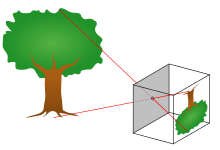
The pinhole acts as the lens, the light being emitted outside the box is forced through the pinhole onto the photographic paper; which is able to record the image coming through the pinhole. However the image being recorded will project onto the paper as an inverted image (it will be upside down and back to front).

If you don’t understand here’s an illustration of the process

See the red lines are the light, because light only travels in a straight line the image becomes inverted.

Now whether the image is clear, detailed or comes through at all is to do with the exposure, i.e the amount of time you allow for light to enter the pinhole. The time will defer whether the image being recorded is inside or outside. 

Remember how the pinhole is the aperture, well that’s measured in increments called f-stops, that’s how you can work out how long you’ll need to lift the shutter to let the light travel through.

Here’s the calculation:

f-stop = distance from pinhole to paper (mm) 
        diameter of pinhole (mm)

So the distance from pinhole to paper, is exactly what it says; so you’re measuring (with the lid on if you have one) from the pinhole to where the photographic paper will lie.

Here’s my calculation:

f-stop = 104
             0.8


We then use the combination of f-stop (f-130), film speed (6 ASA) to calculate the shutter speed (exposure time in seconds/minutes)

Mine worked out to be 3 minutes outside, & 12 minutes outside originally. I say originally because original timings may change, to aid in the improvement of photographs.